In my previous blog, we tried out the openid connect support in WSO2IS. Now lets try out with OpenAM. As OpenAM supports password grant type with openid connect, we are just going to try with it now.
Step 1. Deploy OpenAM and Start OpenAM server. Please find important guidelines on deploying OpenAM in Apache Tomcat server from here. If you just deployed the OpenAM by adding .war file in to tomcat web app directory, Then OpenAM url would be
http://localhost:8080/OpenAM-12.0.0
Step 2. Configure Openid client in OpenAM. Login as admin user (amAdmin) and configure new Openid Connect client. Please follow the screen shots..It would be easy for you…

You can provide the name and password which are the OAuth2 client id and client secret.
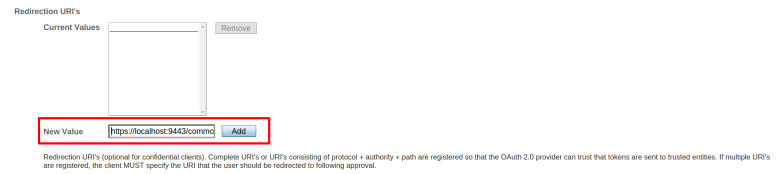
Lets edit the register client
Configure OAuth2 scope value as “openid”
Configure a call back url for your test application (As i am going to test with password grant type, this can be ignored.)
Now we are done with the configuration in the OpenAM.
Step 3. Identify “authorize” and “token” end points of your OpenAM deployment.
By default following are the endpoint
Authorize end point
{URL OF OPENAM}/oauth2/authorize
Token end point
{URL OF OPENAM}/oauth2/access token
Step 4. Send openid connect request to token end point using password grant type.
Sample curl command would be as following.
curl -k -u Test-Client:1234567890
-d "grant_type=password&username=amadmin&password=amadmin123&scope=openid"
-H "Content-Type: application/x-www-form-urlencoded" http://localhost:8080/OpenAM-12.0.0/oauth2/access_token
you will receive the id_token in the response.
{"scope":"openid","expires_in":59,"token_type":"Bearer",
"refresh_token":"a4ab93ad-e460-4c84-a947-972f071bceb5",
"id_token":"eyAidHlwIjogIkpXVCIsICJhbGciOiAiUlMyNTYiLCAiY3R5IjogIkpXVCIsICJraWQiOiAiNDg0ODUxYmQtZDdkYi00MjVkLWFmZjUtYTVkYzAxZDA4M2QwIiB9.eyAidG9rZW5OYW1lIjogImlkX3Rva2VuIiwgImF6cCI6ICJUZXN0LUNsaWVudCIsICJzdWIiOiAiYW1hZG1pbiIsICJhdF9oYXNoIjogInN2bzE1aDVIVmdHT2djVkZMZktXVHciLCAiaXNzIjogImh0dHA6Ly9sb2NhbGhvc3Q6ODA4MC9PcGVuQU0tMTIuMC4wIiwgImlhdCI6IDE0MzE0MTgzNzYsICJhdXRoX3RpbWUiOiAxNDMxNDE4Mzc2LCAiZXhwIjogMTQzMTQxODk3NjAwMCwgInRva2VuVHlwZSI6ICJKV1RUb2tlbiIsICJyZWFsbSI6ICIvIiwgImF1ZCI6IFsgIlRlc3QtQ2xpZW50IiBdLCAib3BzIjogImZkYWVkNWI2LWI1ODgtNDE0OS05MTA2LWQxZDI0MGY4N2NhZCIgfQ.ZZm5XDKBsq3qbkgFOGJqD1geoTLwHUIhuK9NOzXvxKlo_wcMLA_nVRdxNo84dHMyuTJTzwobe-l60MHtsca_h_l5H8LaW6BCtjV1tGt0SRZoozF4oI68SebJBsry1Sex9QfzzwIjtXczzTpcIBSs2ny99uJTHk2zUeK5mi3YFek",
"access_token":"70561e11-31ba-4264-b921-b5869ffc1c91"}
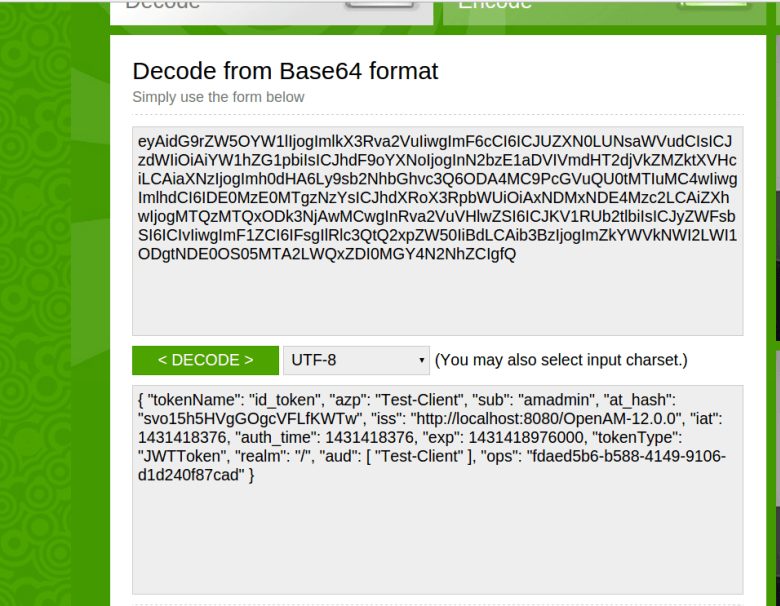
You can Base64 decode the id_token and see the content of it. Please note id_token is a JWT token and it contains the header, body and signature which are separated with the dot (.) . Therefore you need to properly separate each component and decode it.
Decoded sample token body would be as following
Thanks for reading…!!!