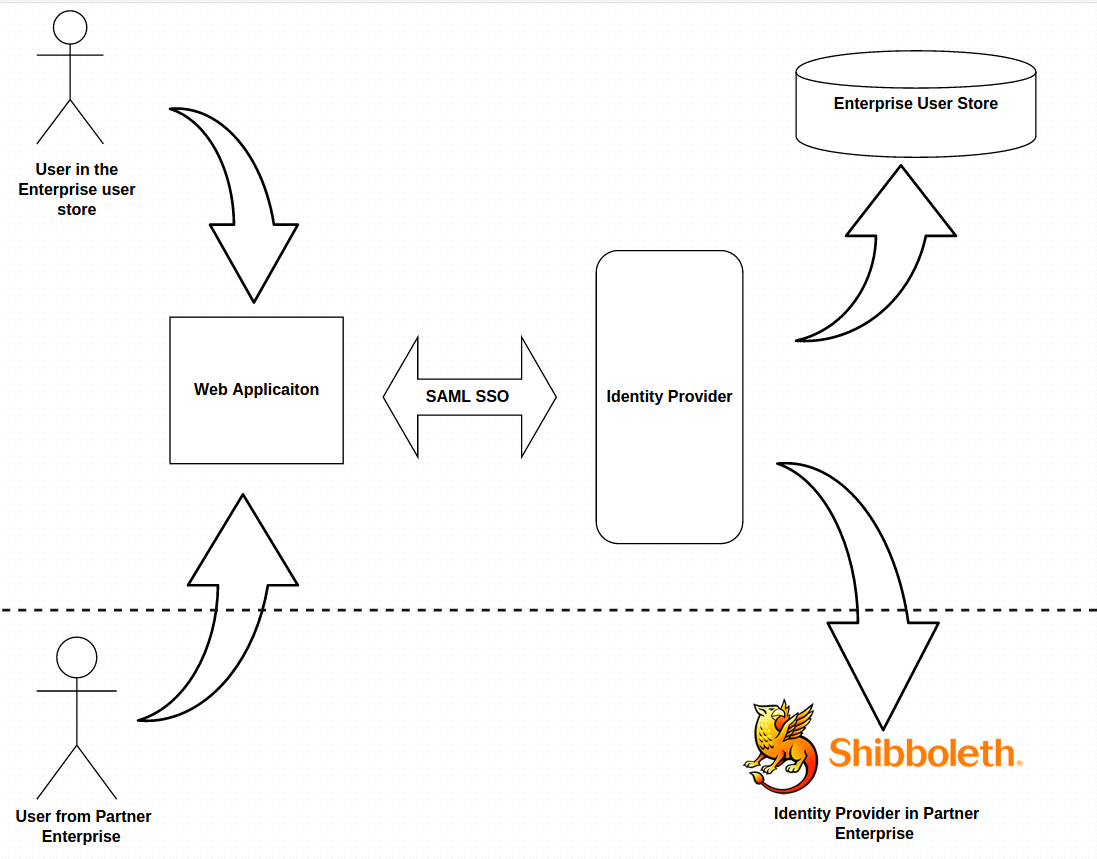
In my previous blog post, we went through how you can configure the SAML2 SSO web application with Identity Server. Users authenticate to Identity Server by proving username/password. These username/password must be authenticated with the enterprise user store that is deployed with Identity Server. Therefore only the user who are in the enterprise user store can access the web application.
Assume, you have a new requirement that web application must be accessed by the users from some other partner organization. Partner organization has their employee’s user accounts in LDAP Server. Partner organization can not expose this LDAP server in to Enterprise Identity Server as a user store due to security reasons. But partner organization has Shibboleth Identity Provider which has been connected with LDAP server. Shibboleth supports SAML2 SSO and it authenticates user with LDAP server. Therefore users from partner organization who need to login to the web application can be redirected to Shibboleth IDP and can be authenticated with their own LDAP Server. How we are going to achieve this?
With Identity Server, you can configure multiple Federated Identity Providers that users can be authenticated. In this use case, users from its own enterprise can be authenticated with enterprise user store and users from partner organization, can be authenticated with Shibboleth IDP.
Let see how we can demonstrate this use case with Identity Server and Shibboleth
Configure Identity Server as SP in Shibboleth
First, you need to configure shibboleth as an SAML2 SSO IDP. This guide clearly explains how you can do it. Please go through it, If you are new to shibboleth.
Please note : IDP_HOME is referred to the shibboleth installation directory.
Step 1. Configure SAML2 meta data for Identity Server. Here Identity Server acts as an SP for shibboleth. Therefore we need to configure SP metadata for the Identity Server. Identity Server still does not support for metadata profile and you can not download the metadata. So let create the file by hand.
Following is the SP metadata for Identity Server.
<EntityDescriptor entityID="wso2is" xmlns="urn:oasis:names:tc:SAML:2.0:metadata">
<SPSSODescriptor protocolSupportEnumeration="urn:oasis:names:tc:SAML:2.0:protocol">
<NameIDFormat>urn:oasis:names:tc:SAML:1.1:nameid-format:unspecified</NameIDFormat>
<AssertionConsumerService index="1" Binding="urn:oasis:names:tc:SAML:2.0:bindings:HTTP-POST" Location="https://localhost:9443/commonauth">
</SPSSODescriptor>
</EntityDescriptor>
Here Location value would be
https://{Identity Server Hostname} : {Port}/commonauth
Lets create a file called wso2is.xml inside IDP_HOME/metadata directory and add above XML content to it.
Step 2. Configure new relying party for Identity Sever.
Here, you want to add new relying party under “RelyingPartyGroup” element in in relying-party.xml which can be found at IDP_HOME/conf directory.
Configuration would be as follows
<RelyingParty id="wso2is" provider="https://idp.example.org/idp/shibboleth" defaultSigningCredentialRef="IdPCredential" defaultAuthenticationMethod="urn:oasis:names:tc:SAML:2.0:ac:classes:PasswordProtectedTransport">
<rp:ProfileConfiguration xsi:type="saml:SAML2SSOProfile" signResponses="always" signAssertions="always" encryptAssertions="never" encryptNameIds="never"/>
</rp:RelyingParty>
Here we have mentioned to sign the both SAML Response and Assertion.
Step 3. Configure new meta data configuration file under the “MetadataProvider” element in relying-party.xml which can be found at IDP_HOME/conf directory.
<metadata:MetadataProvider id="wso2isMD" xsi:type="FilesystemMetadataProvider" xmlns="urn:mace:shibboleth:2.0:metadata" metadataFile="/home/asela/idp/shibboleth/metadata/wso2is.xml" maintainExpiredMetadata="true"/>
Here we have pointed to the new meta data config file that we have created for Identity Server.
Configure shibboleth as SAML2 SSO Federated IDP
Step 1. Login Identity Server managemet console
Step 2. Register new Federated IDP
You need provide a name for IDP config
You need to update the public certificate of the shibboleth. You can find the certificate from IDP_HOME/credentials/idp.crt location. This is need for signature validation of the SAML Response and Assertion.
Go to “SAML2 Web SSO Configuration” and Register following details.
1. Enable – You can enable and set as default
2. Identity Provider Entity Id – This must be the entity Id of the shibboleth IDP. You can find this value from the IDP_HOME/metadata/idp-metadata.xml file. There is attribute called entityID=”https://idp.example.org/idp/shibboleth”
3. Service Provider Entity Id – This must be the Identity Server’s Entity Id. You can use the value that we have configure in the wso2is.xml metadata file. It is “wso2is”
4. SSO URL : This is shibboleth IDP url. you can find this from the IDP_HOME/metadata/idp-metadata.xml file. As we are hoping to use HTTP-Redirect binding to send the SAML Auth request from Identity Server to shibboleth. So we are using following url as SSO URL
https://{Shibboleth Hostname}:{Port}/idp/profile/SAML2/Redirect/SSO
5. Enable Assertion Signing – We can tick on this to verify the SAML Assertion.
Lets keep other configurations with default values.
Step 3. Configure Shibboleth-IDP as Federated IDP for Web application.
There are two ways that you can configure theShibboleth-IDP as Federated IDP.
One way is, just configure it as a federated authentication IDP for web application. Then, once user tries to access the web application, user would be redirect Shibboleth-IDP login page via the identity Server. In here, only the users who can be authenticated viaShibboleth-IDP, can login to web application.
Or less, you can configure using Advance Configuration. Here we configure one step that contains two option of authentication. One is basic authentication that allows to authenticate users from enterprise user store. Other one is Shibboleth-IDP. Once you configure like this, users who are accessing to web application would be promoted a IDP login page with both options. Therefore users from Shibboleth-IDP and enterprise user store can login to web application.
Step 4. Try out .. lets try to login to web application. If you have configured using Advance Configuration, you would see following login page in the Identity Server.
You will be login to Web Application with the Shibboleth IDP… Thanks for reading..