XACML PDP Performance Testing with Thrift

Last time using this blog post,  We discussed on load testing the XACML PDP using Jmeter.  We uses the HTTPS transport for calling the Web Service API that has been exposed by the PDP.  With Identity Server, we can also use Thrift protocal to communicate with PDP.  It is said that thrift is more faster than the HTTP.  Therefore we hope that we can get more performance and less response time by using thrift protocol with Identity Server.

Still i could not found any open source tools that can be used to do load testing with thrift.  Jmeter also does not support it.  But there are some Jmeter plugins for thrift that you can try out.  However,  i wrote some load test tool to try out the PDP with thrift protocol.  You can find the source of this tool from here.

This tool can use to load test both Thrift and HTTP  as I developed this tool mainly to get some comparison with Thrift and HTTP.  You can run this tool as a PEP for load testing the PDP with both HTTP and Thrift.  Then you can get some idea how throughout and response time have been changed when comparing both Thrift and HTTP.

Please Note :  This load test tool is a simple java code. It can calculate throughput and response time in simple manner. Please refer following details.  There may be things that can use to improve this tool.  You can go through source code and you can find out improvements or any issues.  We are really appreciate your feedback.  Please do not compare the result of this tool with proper load testing tool. However simplicity of this tool would not be an issue as intendant of this tool to compare the Thrift and HTTP performance.

Calculating Throughput  :

Before the load test is started the time stamp is calculated, lets say  T1.

After load test is finished,  time stamp is calculated, lets say T2

Total time spend for load test  =  T2 – T1

Number of total message sent  =  Number Of Threads  *  Number Of Request  for Thread

Throughput   =  Total Messages / (T2 – T1)

Time spent for Message =  1 / Throughput  =  (T2 – T1)  / Total Messages

Calculating Average Response time :

Before message is sent from specific thread, the time stamp is calculated, lets say t1.

After message is received, the time stamp is calculated, lets say  t2.

Response time for one message in specific thread  =  t2 – t1

Calculated response time for all messages in specific thread (th1) = (t2 – t1) + …. + … +…

Calculated response time for all messages = th1 +th2 + ……….  + thn

Average response time =  Response time for all messages /  Total Messages

Please go following steps to start your load testing.

Getting Start

According to my previous post, you need to consider following four points.  More details about 1, 2 and 3 points can be found in my previous post.

1.  Generating large number of different XACML policies.
2. Generating different XACML requests.
3. Uploading XACML policies to PDP policy store in Bulk.

4. Implementing load test tool that supports thrift protocol.  You can find the source of this tool from here.  You can download the tool and can run the tool using the command line script. All dependency  jar files can be found in lib directory.  Configuration properties can be found at  resources/config.properties file.  You can go though the README file for more details.

Step to Setup

Step1. Setup Identity Server

Configure MySQL database as WSO2 Identity Server’s data store.  You need to configure master-datasources.xml file which can be found at  <IS_HOME>/repository/conf/datasources. MySQL JDBC driver can be put in to <IS_HOME>/repository/components/lib directory.
Increase memory foot print.  You can configure memory using wso2server script file which can be found at <IS_HOME>/bin directory.

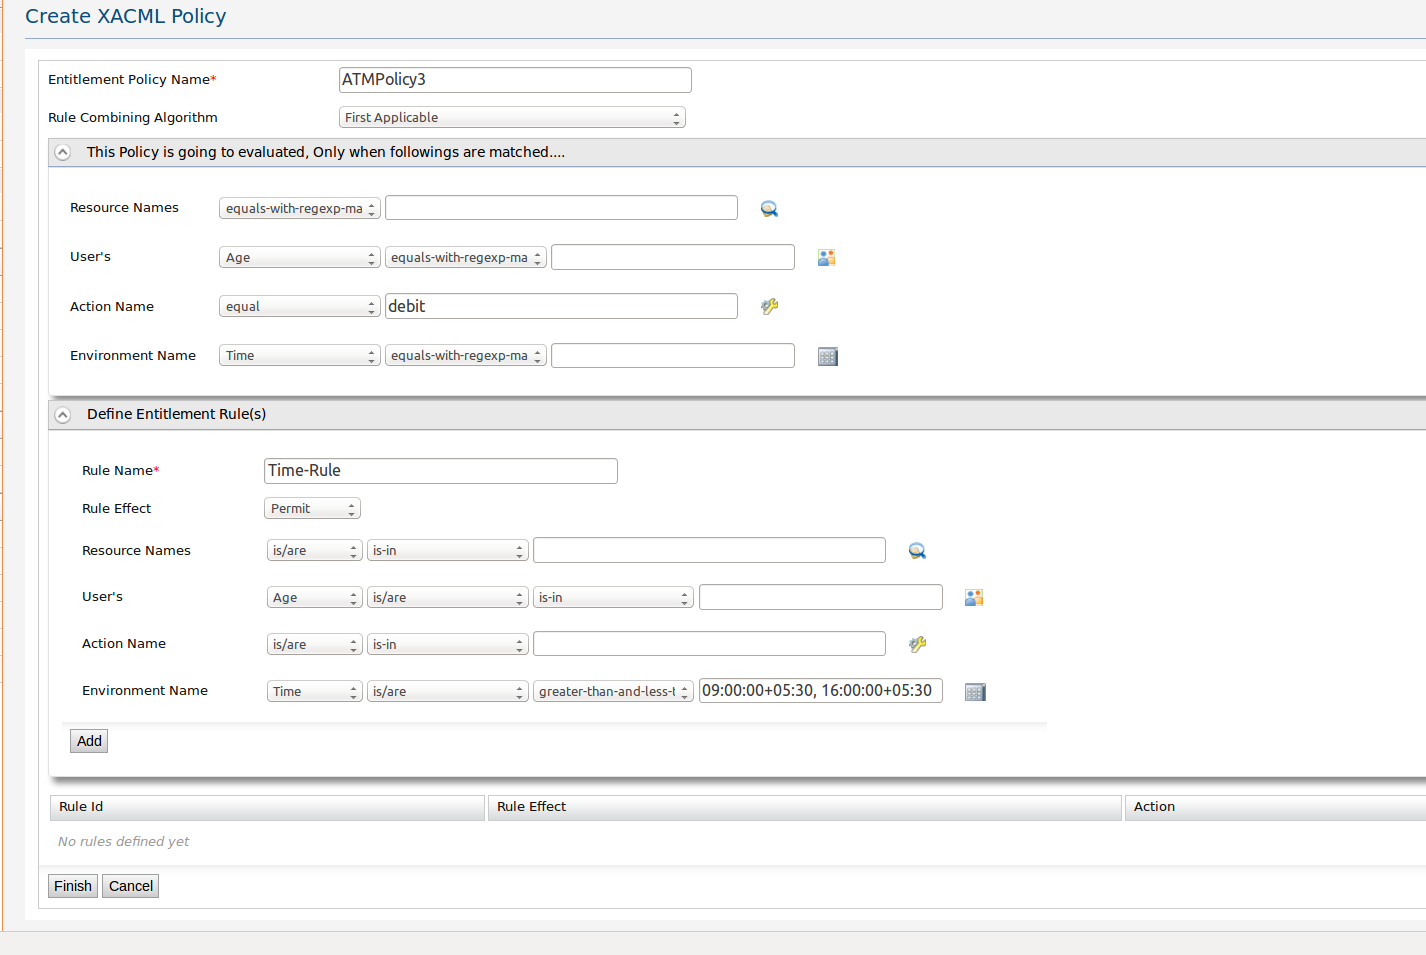
Step2. Create XACML policies and XACML requests using tool. Sample Requests (request.txt) file can be found inside resource directory

Please note : when creating the new  multiple requests from the request generation tool, we need to configure the requestWrapper  as following  “requestWrapper=request”

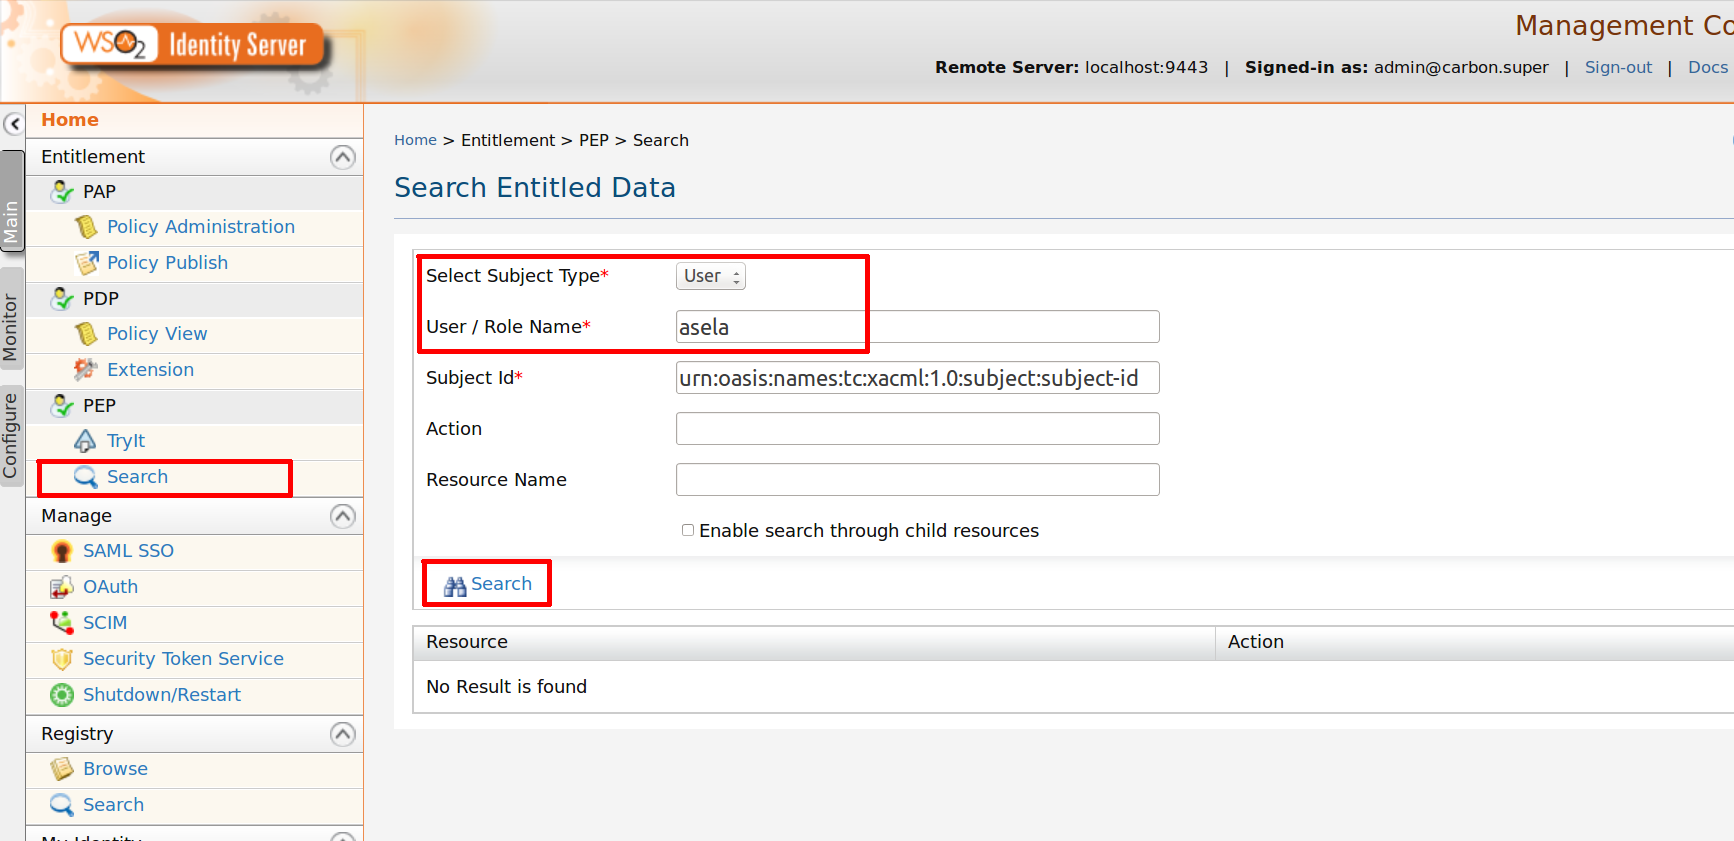
Step3. Upload XACML policies in to Identity Server.

Step4. Run the load test tool by using run.sh or run.bat script file.  Please refer more details from README file.

Now you can run the load test using HTTP and Thrift. You would be able to do comparison of throughput and response time.

Access Control for Data Access Layer with XACML

Lets try to understand how XACML can be used to filter out authorized data from data access layer. Also let learn how we can implement data filtering sample with using open source XACML engine. First it is better to understand sample use case for this.

Use Case

  • KDiamond is company that sells Diamond all other world.   And it stores its sales figures in a database.
  • Every employee in the KDiamond Sale department can access this database and retrieve sales figures.
  • There are many large number of employees in the Sale department across several regions and there are many large number of entries in the database as well.
  • Earlier employee in Sale department can retrieve all Sales figures. But as number of employee are grown…. As this database contains highly sensitive data,, KDiamond wants to provide some access control on these data. It means that all employee are not able to access all data and only the authorized data must be accessed.

Solution

As there are large number of data to filter out,  It is not feasible to do this in presentation or integration layer..  Because it can cause for performance bottlenecks in the system and  also  KDiamond needs more attention on data security  as sensitive data are transported from one layer to another.  Therefore best option is to filter the authorized data from the data layer.. i.e at database level. There are two ways that data can be filtered out.

1. Filter authorized data returned from database.

2. Modify input parameters according to the authorization, before retrieve the data from database.

If there are large number of data set to filter out…  Better approach is to modify the input parameter….

Implementing Sample

Assume,  There are three employee in the sales department …

Bob – Sale Person who is working on Asia region. He is assigned to SalePerson group

Alice – Region Sales Manager in Asia region. She is assigned to SaleManager group

Peter – Global Sales Manager. He is assigned to SaleManager role


Let go through steps to setup this sample with WSO2 Identity Server….


Step 1. Connect Identity Server in to KDiamond user store. You can edit user-mgt.xml file of the Identity Server to connect it to any user store.

Here i have used the embedded LDAP server that is shipped with Identity Server by default. Therefore i have created these users and groups in the LDAP using Identity Server management console… You can create LDAP users called Bob, Alice and Peter and LDAP groups called SalePerson and SaleManager, then assign them to respective groups.

By default, Identity Server user store act as a PIP for its PDP. Therefore, user attributes and groups can be retrieved from LDAP user store for policy evaluation.  In XACML Policy user attributes (or  groups)  can be defined and differently  identified using unique attributeId. This attributeId must be known by the PIP to retrieve the attribute from the user store.  Matching between attributeId and the user store attribute must be in the PIP level. But when your using Identity Server user store as default PIP,  This mapping can be done using claim management feature in Identity Server.  More details on claim management feature can be found at here


Step 2. Add these three policies in to PDP of Identity Sever. You can refer more details on adding policies to PDP runtime from here.

1. Access Policy – Sales data can be view by only the employees in Sale department.. that is, employees who are assigned to SalePerson and SaleManager groups. Sales data can be only shared and deleted by Sale Managers

2. Region Policy – Sales data related specific region must be read by who are in that region or who are in global sale managers

3. Value Policy – If sales data related to more than $50 000 value, Sales person can not see the name of the client details. But Sale Managers can see.


Step 3. Download the KDiamond sample from here. This is a command line sample and all dependent libraries can be found inside lib directory in sample location. This sample contains a PEP data access module that modifies the data access queries. You can find the implementation of this module from here. It is a simple module that extracts the Advice elements from XACML response and modifies the given Queries.

Let me explain further what is happening here…..

There are four policies, If you just look at Region, Value and Type Policies.. You can see Advice expression that has been configured. These Advice expressions return some input and output controllers according to the query language that you are using to access the data. As an example, in above polices I have define the SQL based controllers. But it can be any String values according to your data access language.

Once XACML response is received to the PEP data access module, It extracts  input and output controllers from XACML Advice elements.  Then PEP module can load the relevant query processor to modify the data access queries with  input and output controllers.  Query processor is an implementation, that you need to implement according to your data access query language. Here i am using SQL, Therefore i have SQL based query processor that processes the query that is given by the KDiamond and the input and output controllers that have been taken from Advice elements. Query processor knows how to process them and create the modified and the authorized query to access the data.

Following diagram would further help you to understand this process….

Webinar on XACML – Uncovering XACML to Solve Real World Business Use Cases

Despite challenges such as performance bottlenecks, complexity and integration difficulties, XACML holds its position as the number one choice for addressing fine grain and policy based access control needs. Because of its ability to support externalized and standardized architectures, attribute based access control, and fine grained authorization, developers and architects try to minimize the adverse effects of XACML while capitalizing on its advantages.

This webinar will discuss some of the key advantages XACML provides over a traditional authorization system, as well as the bottlenecks XACML creates, and how to balance out the two. This session will take you through various business use cases implemented with XACML by counteracting its own disadvantages.

Topics covered include:

  • Authorization Concepts.
  • Disadvantages with traditional authorization systems.
  • Introduction to XACML and its advantages.
  • Business use case with XACML.
    • Building centralized entitlement system with existing legacy authorization data.
    • Fine grain access control for SOAP and REST based web services.
    • Building Access control for Web applications.
    • Adding entitlement for enterprise data.

If you are a security architect or developer planning SOA deployments, implementing specific authorization mechanisms or simply learning industry best practices for security, then this webinar is for you.

Please register for webinar from here.

Policy Store Notifications with Identity Server

In administrative point of view, policy notifications play a major role… It is some kind of a must feature that policy engine supports. In a typical enterprise, authorization policies are defined by a policy administrator who has some knowledge on authorization language such as XACML… Then these policies must be reviewed by the management to apply them in to the run time… PDP policy store is a critical space as all authorization logics in the enterprise manage through it.. Therefore It is important to track the policy store changes by the managers and administrator by using some kind of policy notification mechanism.

Let see, how we can configure the Identity Server supports for policy notifications… Unfortunately there is no any default module that has been shipped to support this. But there are extension points that can be used to plug any notification modules that you wish.

I have written a notification extension and the project can be found here. Following are the things that is supported by this module.

  • Email and REST (XML and JSON) notifications are supported. Currently this module can be configured for one notification type. It means it can send either EMAIL or REST XML or REST JSON.
  • Notifications can be generated for both PAP policy store and PDP policy store. You want to understand more what is meant by PAP and PDP policy store.. Please read this
  • Currently Notification can contain policy identifier, user (the user who perform the action on the policy) and action name (whether the action is -> add, update, delete, enable)

How to configure

Step1. Build this project using Maven 3.0. You can find the built jar file from here. You can do any changes that you wish, in to the source of the project before it is built.

Step2. Copy built jar file i.e org.wso2.carbon.identity.notification.extension-1.0.0.jar in to <IS_HOME>/repository/component/lib directory

Step3. Register notification module using entitlement.properties file which can be found at <IS_HOME>/repository/conf/security directory. You need to configure full qaulified class name of the module and some configuration related to it… Please find sample entitlement.properties file with those configurations from here

Step4. If you are using EMAIL as notification, Please configure email transport details using axis2.xml file which can be found at <IS_HOME>/repository/conf/axis2 directory. Sample configuration would be as follows.

<transportSender name="mailto"
 class="org.apache.axis2.transport.mail.MailTransportSender">
 <parameter name="mail.smtp.from">[email protected]</parameter>
 <parameter name="mail.smtp.user">wso2demomail</parameter>
 <parameter name="mail.smtp.password">mailpassword</parameter>
 <parameter name="mail.smtp.host">smtp.gmail.com</parameter>
<parameter name="mail.smtp.port">587</parameter>
 <parameter name="mail.smtp.starttls.enable">true</parameter>
 <parameter name="mail.smtp.auth">true</parameter>
 </transportSender>

Notification Module Configuration

There are nine configurations option are available with this module.. You can configure all of them in the entitlement.properties file.

org.wso2.carbon.identity.notification.extension.EntitlementNotificationExtension.1=notificationType,JSON
#org.wso2.carbon.identity.notification.extension.EntitlementNotificationExtension.1=notificationType,XML
#org.wso2.carbon.identity.notification.extension.EntitlementNotificationExtension.1=notificationType,EMAIL
org.wso2.carbon.identity.notification.extension.EntitlementNotificationExtension.2=ignoreServerVerification,true
org.wso2.carbon.identity.notification.extension.EntitlementNotificationExtension.3=targetUrl,http://localhost:9765/
#org.wso2.carbon.identity.notification.extension.EntitlementNotificationExtension.3=targetUrl,[email protected]
#org.wso2.carbon.identity.notification.extension.EntitlementNotificationExtension.4=emailTemplateFile,/home/asela/is/wso2is-4.5.0/repository/conf/security/entitlement-email-config
#org.wso2.carbon.identity.notification.extension.EntitlementNotificationExtension.5=emailSubject,Policy Notification
#org.wso2.carbon.identity.notification.extension.EntitlementNotificationExtension.6=roleName, admin
#org.wso2.carbon.identity.notification.extension.EntitlementNotificationExtension.7=pdpNotificationAction, ENABLE;DISABLE;UPDATE;DELETE
#org.wso2.carbon.identity.notification.extension.EntitlementNotificationExtension.8=papNotification,true
#org.wso2.carbon.identity.notification.extension.EntitlementNotificationExtension.9=pdpNotification,false

Lets go through more detail on them…

1. notificationType : Type of the notification supported by module whether it is

EMAIL or XML or JSON

2. pdpNotification : PDP notifications. Whether notification must be sent for PDP policy store changes. By default this is enable. But if you want to disable the policy configurations, you can disable it by configuring this property

3. pdpNotificationAction : PDP notification actions. Whether notification must be sent only for some particular changes. There are four actions and you can define multiple actions using semicolon.

ENABLE;DISABLE;UPDATE;DELETE

By default notifications are sent to all type of changes. But if you want to limit it, you can configure this property

4. papNotification : PAP notifications. Whether notification must be sent for PAP policy store changes. By default this disable and you can enable it by configuring this property.

5. targetUrl : Target url.

If XML and JSON notification type is used, Target url is the end point url
If EMAIL notification type is used, Target url is an email address

6. roleName:  User group. If EMAIL notification type is used and Target Url is not defined. You can define the user group that email must be sent. (Say: You need to send email to all the member of the Administrator group)

7. ignoreServerVerification : SSL verification configuration, Whether to ignore or validate SSL verification for end point url, if XML and JSON notification types are used.

8. emailTemplateFile : Email Template. If EMAIL notification is used. The subject, body and footer of email must be defined. These can be load from separate fine… There is default format for them, If you want to override it, you can configure location to a template file using this. You need to configure the absolute path for the template file. Sample template file can be found here

9. emailSubject : Subject of the email, If you do not like for the default email support that is used by the module.

Sample Messages

Sample XML notification message.

<PolicyNotification>
 <PolicyId>TestPolicy</PolicyId>
 <Action>UPDATE</Action>
 <User>admin</User>
</PolicyNotification>

Sample JSON notification message.

{"PolicyNotification":{"User":"admin","PolicyId":"TestPolicy","Action":"UPDATE"}}

Limitations & Improvements

Some of the limitations that i would like to mention with this module……

  • Notification type can not be changed according to policy, user (who update the policy) or any other factors.
  • Notification url (or email address) is same for all policy updates or it is also changed according to policy, user (who update the policy) or any other factor ?
  • XML policy can not be send as a notification. Once policy Id is there, you can extract the policy later.

You always have freedom to modify this module and use it..  according to your requirement….

Banking Sample with XACML

Lets try to understand how XACML can be used in banking applications and how to implement a sample banking authorization system with open source XACML engine.

Use case

demo1

  • There is bank call KBank, that supports ATM facilities and online money transfer faculties for its own customers.
  • KBank has LDAP user store that contains customer details (User attributes and groups)
  • KBank has legacy banking application that contains details about the customer’s bank accounts
  • When money is debited from ATM machine, customer must be authenticated with card (name) and password.
  • When money is transferred using online application, customer must be authenticated with username and password.
  • Later KBank understood that authentication is not enough, there are some requirements for authorization to provide better user experience and better security for ATM and Online customers.

One of the example would be following.

KBank has given privilege level to its own customers.. There are two privilege levels. i.e Gold and Silver. Only few customers are assigned to these two privilege levels. These assignments are maintained in the user store by creating two groups called Gold and Silver and assigning users to them.

Authorization System with XACML

demo2

  • ATM machine and Online application would act as PEP, where it calls to centralized PDP for authorization decisions
  • Managers and Policy administrators in the KBank would define the XACML policies for the PDP. There must be a user friendly interface for it.
  • Polices would be stored in a policy store.
  • Authorization decision can not be taken only by evaluating polices. There must be a way to call KBank user store and Legacy Banking applications to build the correct decision. PDP must support for multiple PIP points that can retrieve data from these external system.

Implementing Sample Authorization System

Assume. There are three customers….

bob -> has Gold Privileges. Account Balance of $ 50000.00

alice -> has Gold Privileges. Account Balance of $ 10000.00

peter -> has Silver Privileges . Account Balance of $ 30000.00

Step 1. Connect Identity Server in to KBank user store. You can edit user-mgt.xml file of the Identity Server to connect it to any user store.

Here i have used the embedded LDAP server that is shipped with Identity Server by default. Therefore i have created these users and groups in the LDAP using Identity Server management console… You can create LDAP users called  bob, alice and peter  and LDAP groups called  Gold and Silver,  then assign them to respective groups.

By default, Identity Server user store act as a PIP for its PDP. Therefore, user attributes and groups can be retrieved from LDAP user store for policy evaluation.

Step 2. Deploy custom PIP module for Legacy Banking application to retrieve customer account balance.

Please find sample PIP module from here.  Please refer README file.  You can find more details on writing  PIP module from here.

Step 3. Add these two policies in to PDP of Identity Sever. You can refer more details on adding policies to PDP runtime from here.

ATMPolicy1 — This policy contains rule to check whether users has account balance more than the amount that is tried to debit. This policy calls PIP module to retrieve the account balance of the user.

ATMPolicy2 — This policy contains the rules to check whether user’s privileges. This policy also calls PIP module to retrieve the user’s roles.

Step 4. Download the ATM sample from here.  This is a command line sample and all dependent libraries can be found within the sample. This ATM sample contains a PEP module that calls to Web service API of Identity Server PDP

Extending Sample

Say, KBank needs to apply new rule in to ATM machines that customer can only debit money from 9.00AM to 4.00PM.

Step 1. Create new time based Policy

I have used the basic policy editor of Identity Server to create this policy…

demo3

Step 2. Publish policy in to PDP

Step 3. Reorder the policy to bring it as the first policy in the PDP policy store

Step 4  Enable the Policy

You can extend this sample adding new polices.. such as above……

Migration XACML policies from older versions to new Identity Server versions.

Latest WSO2 Identity Server (4.5.0 and after it…) have lot changes when it is compared with its older versions (4.0.0, 4.1.0)…. There are database schema changes in user management databases and also lot changes in XACML space, (Please refer this for more details). Therefore, you can not plug new Identity Server versions with your old existing data directly (with the database that is used by older version such as 4.0.0 and 4.1.0). You must need to update database schema and do some more things to get it works.
In XACML, there are some changes of default policies locations (PDP and so on), and some implementation changes that would be effected in migrations. This blog would mainly explain how you can migrate XACML policies in older version to new Identity Server versions.

Step 1

You need to go through these database migration guide lines (if your  new server is 4.5.0). Basically you want to run this migration script with older database (Identity Server 4.0.0 and 4.1.0 databases). This would not change or modify any existing data. But this would alter some tables by adding new columns, would create new set of tables with default data and would delete some unwanted tables.

IMPORTANT NOTE : If you want to get the migrated database to be worked with older versions, after even migration has been done. You want to make sure following.

a) Please do not delete tables… You can remove following from migration script. (Some time it may have been removed already)

DROP TABLE IF EXISTS UM_CLAIM_BEHAVIOR;

b) If migration script have already deleted this table. Please create it by running following script,
that can be found in <IS_HOME>/dbscripts directory of older Identity Server versions.

CREATE TABLE UM_CLAIM_BEHAVIOR(
UM_ID INTEGER NOT NULL AUTO_INCREMENT,
UM_PROFILE_ID INTEGER,
UM_CLAIM_ID INTEGER,
UM_BEHAVIOUR SMALLINT,
UM_TENANT_ID INTEGER DEFAULT 0,
FOREIGN KEY(UM_PROFILE_ID, UM_TENANT_ID) REFERENCES UM_PROFILE_CONFIG(UM_ID, UM_TENANT_ID),
FOREIGN KEY(UM_CLAIM_ID, UM_TENANT_ID) REFERENCES UM_CLAIM(UM_ID, UM_TENANT_ID),
PRIMARY KEY (UM_ID, UM_TENANT_ID)
) ENGINE INNODB;

Step 2

Start new Identity Server instance by pointing to modified old database  (if you do not modified database as in Step1, You can not start server) and by pointing to the same user store that is used by older server (4.0.0 or 4.1.0).

Here you may need to modify the default configuration of “master-datasources.xml” file and “user-mgt.xml” to connect to older database and older user store.

Step 3

Login to new Identity Server and go to entitlement management console. You would NOT see any policies that were there in older version. But if you travel through the registry browser to following location

/_system/governance/repository/identity/Entitlement

You would find policies… Policies are already there; but new Identity Server would not be able to read them. Basically new Identity Server would not read policies from above registry location by default. Therefore we need to move these content in to new location and make it readable for new Identity Server version.

Step 4

You can find a simple tool that I have created to do above mentioned migration, from here. Please download it with the source. Let me explain what this tool does.

a) Retrieve policies from old Identity Server version.

b) Verify whether each policy has been published to PDP or Not.

c) Upload all policies to new Identity Server version.

If there are policies that have been published PDP (in older version) -> Push them in to PDP as enabled policies.

If there are policies that have been NOT published PDP (in older version) -> Push them as PAP policies.

Note : In older Identity Server version, there was a concept of enable/disable in PAP polices. And now, it has been moved to PDP. Therefore we do not want to consider it, as all policies are migrated as enabled PDP policies.

d) Retrieve global policy combining algorithm from older versions and set it in the new version.

 Step 5 

Run the tool to migrate policies. README file contain more details.

Now you are done… !!!

Searching entitlements in XACML Policies – GetEntitledAttributes

In my previous post, we went though defining XACML policies for web application. Now i am going to try out the scenario, that is defined in that blog post, with third approach. i.e. By using “getEntitledAttributes” method in Entitlement Service API of Identity Server.   Identity Server is an open source XACML engine that supports XACML 3.0.  “getEntitledAttributes” is a method which can be used to retrieve entitled attributes for given user or role. This API method is specific to Identity Server and you can read more details about this from here

Step 1.  You need to upload and publish these policies in to the XACML PDP as enabled policies. You can find more details from here.

Step 2. Use PEP Search tool to invoke the PDP (Or else you can invoke getEntitledAttributes method of the PDP web service API using a SOAP client such as SOAP UI )

Here i am going to retrieve entitled resources for given user called “asela” that has been assigned to “InternalUsers” role

search1

Step 3. You can see the entitled attributes values. i.e resources and actions names.

search2

As mentioned in my previous blog post,  This is not an efficient API method.  Due to two reasons, If i summarized them again

  • This method internally creates all possible XACML requests and they are evaluated with PDP.
  • Attribute values are retrieved by parsing policies to create XACML requests.

In this scenario, As we know the actions set that is related to each web page, Therefore we can feed the action set in to the PDP. Then PDP does not want to extract attribute values from XACML policies and also It can be avoided the creating of some unwanted XACML requests. There is a method that you can extend to feed attribute values that you wish

You can find the sample implementation from here that is an extended version of default policy finder module. Here  “getSearchAttributes”  has been extended to feed the resource and actions names You can try out this scenario with this implementation.  Please go through following additional steps. Here i have found that, number request that have been created internally is reduced by half. With default implementation,  If was around 61 XACML requests and with sample implementation it is 32 XACML requests. That is some improvement. Also It is not parsing XACML policies which is also good for performance.

Step 1. Write a New Policy Finder module by extending the default “RegistryPolicyStoreManageModule”.  Please find the “SamplePolicyAttributeRetriever” class from here.

Step 2. You need to create a jar file. You can build the project using maven 3 and create the jar file.

Step 3. Copy created  org.xacmlinfo.xacml.search.extension-1.0.0.jar in to <IS_HOME>/repository/components/lib directory

Step 4. Copy any dependency libraries for PIP module to <IS_HOME>/repository/components/lib directory.

Step 5. Open the entitlement.properties file which can be found at <IS_HOME>/repository/conf/security  directory  and register your new policy finder module. Following is the sample configuration and i have removed the default policy finder and have added new extended policy finder.

PDP.Policy.Finder.1=org.xacmlinfo.xacml.search.extension.SamplePolicyAttributeRetriever

Step 6Restart the Server if already has been started.

You can actually debug this sample code by starting the WSO2 Identity Server in the debug mode as follows

wso2server.sh –debug 5005 (UNIX) or wso2server.bat –debug 5005 (Windows)

Then you can clearly see how the method in “SamplePolicyAttributeRetriever” are called by the PDP.