In my previous blog post, we went through how you can configure the SAML2 SSO web application with Identity Server. Users authenticate to Identity Server by proving username/password. These username/password must be authenticated with the enterprise user store that is deployed with Identity Server. Therefore; only the user who are in the enterprise user store can access the web application.
Assume, you have a new requirement that web application must be accessed by the users from some other partner organization. Partner organization has their employee’s user accounts in LDAP Server. Partner organization can not expose this LDAP server in to Enterprise Identity Server as a user store due to security reasons. But partner organization has OpenAM Identity Provider which has been connected with LDAP server. OpenAM supports SAML2 SSO/Openid-Connect and it authenticates user with LDAP server. Therefore users from partner organization who need to login to the web application can be redirected to OpenAM IDP and can be authenticated with their own LDAP Server. How we are going to achieve this?
With Identity Server, you can configure multiple Federated Identity Providers that users can be authenticated. In this use case, users from its own enterprise can be authenticated with enterprise user store and users from partner organization, can be authenticated with OpenAM IDP.
Now let see how we can integrate OpenAM and WSO2IS using Openid-Connect.
Configure WSO2IS as OpenId-Connect Client Application in OpenAM
Step 1. Please find more details on Openid-Connect client application registration from here. You want to go through same steps. I would like to highlight some important steps using the screen shots.
You can provide the name and password which are the OAuth2 client id and client secret.
Configure scope value to be “openid”
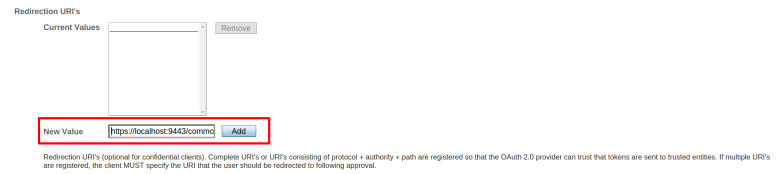
Configure the call back url for your WSO2IS, this must be following value.
https://{HOST_NAME}:{PORT}/commonauth
Configure OpenAM as Federated OpenId-Connect IDP
Step 1. Login to WSO2IS management console
Step 2. Register new Federated IDP
You need provide a name for IDP configuration. Say “OpenAM-IDP”
Go to “OAuth2/OpenID Connect Configuration” and Register following details.
1. Enable / Default – You can enable and set as default
2. Authorization Endpoint URL – http://localhost:8080/OpenAM-12.0.0/oauth2/authorize
3. Token Endpoint URL – http://localhost:8080/OpenAM-12.0.0/oauth2/access_token
4. Client Id – WSO2IS (Value that is provided by us when registering in OpenAM)
5. Client Secret – (Value that is provided by us when registering in OpenAM)
6. Additional Query Parameters – scope=openid (This is not required. By default, WSO2IS sends the openid scope)
Step 3. Configure OpenAM-IDP as Federated IDP for our Web application.
There are two ways that you can attach the OpenAM-IDP as Federated IDP.
One way is, just configure it as a federated authentication IDP for web application. Then, once user tries to access the web application, user would be redirect OpenAM-IDP login page via the identity Server. In here, only the users who can be authenticated via OpenAM-IDP, can login to web application.
Or less, you can configure using Advance Configuration. Here we configure one step that contains two option of authentication. One is basic authentication that allows to authenticate users from enterprise user store. Other one is OpenAM-IDP. Once you configure like this, users who are accessing to web application would be promoted a IDP login page with both options. Therefore users from OpenAM-IDP and enterprise user store can login to web application.
Try out
Lets try to login to web application. If you have configured using Advance Configuration, you would see following login page in the Identity Server.
When you click on OpenAM-IDP, you would be redirected to OpenAM login and user consent pages.

By default, WSO2IS extracts the username from id_token (“sub” attribute) and sends it back to the Web application using SAML2 SSO